Showing posts with label 3D. Show all posts

Sunday, January 19, 2014

Magnetic Children's Art Display

I have recently sacrificed my craft room and converted it into a playroom for Benjamin. Ben loves to colour already and I wanted to find a fun way to display his art that would be quick and easy to change out with each new masterpiece.

I looked all over pinterest and found many different ideas, but wasn't a huge fan of any of them until I saw this one for DIY Magnetic Frame Gallery. This is my take on it. You can even see Ben's very first piece of artwork on it!
This project was super easy. I picked out frames that I liked that were bigger than an 8.5x11" piece of paper so that his art would have a border to it between it and the frame. I am lucky enough to have a plumber for a dad, so I had him cut me some galvanized steel sheet metal just smaller than the frame so it wouldn't have any sharp edges. Then I bought some fabric I liked (in this case cars because his playroom is covered in them) and wrapped it around the sheet metal and stuck it all in the frame. I wanted cute fabric so the frames would still look nice when there was no art on them. Then once on the wall, changing his artwork just requires moving of a magnet!

I love the way it turned out and Ben does too, it got a "WOW" when he saw it!

Tuesday, December 3, 2013

DIY Advent Calendar

I can't say this was a quick or cheap project, but I LOVE the way that it turned out! Plus, we plan to get many years of use out of it considering Ben is only 19 months.
I had purchased the vinyl from Stampin Up! probably about 4 or 5 years ago but only now that I have Ben did I bother putting it all together. I bought a large frame from Michael's and put a white poster board inside of it. Using double sided tape, I adhered the red and green ribbons along the two borders of the frame (this wasn't initially part of my plan, but it developed as I felt the outside part looked too white). The containers are just little containers from Michaels from the wedding favours section and I put a piece of Stampin Up paper inside each and adhered the tins with glue dots. The numbers are on green and white paper and attached with a magnet so they can easily be switched out everyday - it's a bit early for Ben to do so (he'd probably just eat the magnet) so it's currently being kept out of his reach!

Saturday, September 7, 2013

Personalized Hanger

A good friend of mine recently got married and seeing as I got her lingerie for her bridal shower, I wanted a nice way to present it. I saw these gorgeous personalized hangers that you could buy on etsy but they were ridiculously expensive once shipping was added on, so I thought I would try it out on my own!
To make it, I bought wooden hangers and drilled a hole on both sides of the hanger for the wire to sit it. I used 12 guage wire and sketched out a design on paper before trying to experiment with the wire. Once I had a design I liked, I copied it using mostly just my hands and needle-nose pliers to tighten up some of the loops. I tried doing her last name countless times, but I just couldn't get it to look good, so I opted just for "Mrs." Once the wire was arranged, I cut it down to size and super-glued each end into the holes.

I think it turned out pretty well, would have been nicer to have the new last name, but to pay an extra $30 for it on top of the lingerie and other gifts was just too much for me!

Thursday, October 27, 2011

More Halloween Decor

I posted my candles that I made for Halloween a couple days ago and here is some more Halloween decor I made for around the house.
These pumpkins were made using the Definitely Decorative vinyl "Spooky Expressions." I actually purchased these around when they first came out but I didn't have anywhere to put them since we were in the apartment. Now that we have a house, we have tons of places to put them! I have one in our kitchen, one in the dining room and one in the living room.

This is a totally non-SU project, but I wanted to share the wreath I made for our front door for Halloween. It was super cheap to create and fairly easy too (except for the second degree burn I got on my finger from the hot glue gun)!
I purchased a wire wreath frame from Michael's and wrapped it with 8 feather boas I got at the dollar store. Then I pulled the leaves off the stems of the skulls (you may have noticed that they are placed underneath the candles I posted a couple days ago) that I got at Michaels and wrapped them around the frame. Finally, I tied on some orange Christmas balls to the frame as well. There are actually quite a few more than you can see in the photo, but the wind made the feathers cover them up when I was photographing it.

Hope you enjoy some of my Halloween projects!

Tuesday, October 25, 2011

Halloween Candles

I had been playing with MDS a lot earlier in the month to be able to enter the MDS contest to win downloads and came up with this idea as well.
I created the bands in MDS, printed them, mounted them on black cardstock and wrapped them around the candles. I left them loose enough so that I could slide them off and save them for next year! There are a couple of additional candles that aren't in the photo because they sit up on top of the fireplace mantle.

Saturday, February 26, 2011

MDS Wedding CD Cover

I recently had a week off and made myself a huge list of all the things I needed to do so I wouldn't forget anything. One of the things I was supposed to order an 8x10" photo from our wedding for Grant's Mom. I couldn't pick which one she would want so we called and said we would just send her a CD of all the wedding photos and then she could order which ever one she wanted.
Then, just for fun, I made this cover for the CD case to go with it using our wedding colours.

If you are interested, you can view the following things I made for our wedding using these colours:
-wedding invitations and RSVPs here
-my thank you notes for my bridal shower here
-wedding thank yous here (we ended up using the first thank you card that Grant liked better) and,
-our seating plan and table numbers here

Monday, February 14, 2011

Valentine Love Bots Boxes

First off - Happy Valentine's Day.

When I saw that SU had these Love Bots boxes for Valentine's day in the clearance rack I had to get them for Grant to use for his students.
Here you can see how the open and we have filled them with various Valentine's treats. Click on any of the pictures to enlarge them.
This above are the "Love Bots Boy" boxes which are no longer available.
This is the "Love Bots Girl" boxes and they are still available in the clearance rack for a great price AND they count towards your Sale-A-Bration rewards! If you are like myself and Grant, it doesn't matter than there are boy and girl versions (we used pink and blue for either gender).

Friday, December 31, 2010

Christmas Cookie Bags

Here's the last project I created for this Christmas. I made these cookie treat bags for dessert following Christmas dinner. I had purchased these glassine bags when SU had them out during Valentine's Day (unfortunately they are no longer available) and have been waiting for the perfect time to use them.
I ran the glassine bags through my cuttlebug using the swiss dots embossing folder so they would have more texture. Before putting my Christmas cookies (each bag contained 4 cookies), I put them inside SU cello bags so the glassine bags wouldn't get all greasy.  
Then I just wrapped a piece of the dp around it, added the stamped circles and adhered a white felt flurry snowflake using the real red glitter brads from the Holiday Mini that coordinate with the red glitter on the dp! I made 6 treat bags and each had a different shaped felt flurry attached so everyone would know which was theirs to take home. Unfortunately, I couldn't get a good picture of all of them because of the shadows they created and the light shining off all the glitter! A very quick but fun project!

Stamps: SU Holiday Collection (retired)
Ink: SU baja breeze
Paper: SU ww, real red, candy cane christmas dp (unavailable)
Brad: SU real red glitter brad
Snowflake: SU felt flurries (retired)
Misc: Swiss dots embossing folder, SU glassine (retired) and medium cello bags, glue dots, circle cutter

This could easily be a SUO project if the swiss dots embossing folder was substituted for the SU perfect polka dots embossing folder.

Wednesday, December 22, 2010

Christmas Ornaments!

Again this year, I made ornaments for Grant's students. You can find the ones I made last year here. This year, I used the Jolly Bingo Bits set - it's not quite as colourful but the images are just so cute (plus I wanted to use an actual stamp as trying to emboss transparency paper that has been through a printer makes it very difficult to get clean lines).
While I was in the process of making these, my Mom brought Grant super cute ornaments for him to give to his students. They were miniature ornament versions of the reindeer here. So, as it turns out, we'll be hanging on to the ornaments I made until next year to give those students. Then, we'll write their name and the year inside the ornament too!

Stamps: SU Jolly Bingo Bits
Ink: SU versamark
Embossing Powder: SU white, basic black
Ribbon: SU silver elastic cord, 1/8" real red tafetta
Misc: ornaments, glitter, transparency

Tuesday, December 21, 2010

Christmas Tags

Here are some of the Christmas tags I made this year! They are all using Stampin' Up only supplies but much of it is retired!

Monday, July 19, 2010

Dandelion Flurry

It's been a while again since I last posted and will probably be a while again following this post. Since Grant is a teacher, he has the summer off and we've been spending lots of time doing things and visiting people we didn't have time to during the school year.

One of the small things we have done is create the following canvas for our future bedroom in the house we're building. We've had this dark gray dandelion flurry decor element from Stampin' Up! for a long time but never put it together because we were waiting to decide what colour our new sheets would be so we could match the canvas to them. Our duvet is a nickel colour - which matches nicely with the dark gray and the sheets are a dark red (although the canvas looks a bit brighter in the photo). We love the way it turned out. This is actually a very large canvas too 30" x 40". For the time being we have it hanging in our living room.

As for our house, it's coming along very nicely and quickly. They are really ahead of schedule at this point so we are getting excited! Here's a pic for those who are interested!

Thursday, June 17, 2010

Baby Boy Gift Set

Now that I am starting to feel a bit like myself again following surgery, I decided to give a MTME template a try for a baby shower next week. I had previously created a 3D house here for a housewarming gift and it was so easy so I thought I would try out the baby carriage template. This template was so easy and I love the way it turned out! Here are a couple of other views: This template is quite large as is too. Inside of there I have 3 onsies and 3 pairs of grippy socks! A bit more fun than wrapping the gift or putting it in a gift bag!

Paper: SU ww, bashful blue, delicate dots dp (retired)
Punches: SU scallop edge, 1", 1 1/4" and 1 3/8" circle, scallop circle
Button: SU bashful blue (from sherbert designer buttons pack)
Misc: MTME bouncing baby buggy template, SU sticky strip

Tuesday, April 27, 2010

Small Housewarming Gift

This past weekend I went to a get together with a bunch of my coworkers. The girl whose house we were going to just recently bought it so I wanted to bring a small housewarming gift for her. I had seen some 3D templates of houses and decided to give one from PTI a try to bring the gift in!

This is the front view of the house. I don't own any house themed stamps so I just cut a couple rectangles for the door and window. Back view of the house. House filled with candy. As you can see, I used some ribbon to cover the edge of the roof piece. This project was so easy but quite time-consuming. I love the way it turned out and my coworker loved it. I even used her actual house as inspiration and used her exterior colours as the colours of the paper house. She is crafty too - but more in a sewing/baking way so she totally appreciated it and showed it off to everyone else who came!

This project features two colours being affected by the colour renovation:
-mellow moss cardstock, which will be retiring so order it soon if you are interested!
-river rock ribbon was an in colour a few catalogues ago, and this colour will be returning as a part of the neutrals collection in July's catalogue!

After spending so much time making the house, I lost all my steam so I created a super simple card. All I did was cut some white cardstock as the card base and matted some of the "good neighbours" dp from SAB on old olive cardstock. Inside the card I stamped the sentiment "welcome home."

Supplies

House
Papers: SU ww, mellow moss, chocolate chip, sahara sand
Ribbon: SU river rock (retired)
Brad: SU silver

Card
Paper: SU ww, old olive, good neighbour dp (retired)
Stamp (inside the card): SU sweet little sentiments (retired)

Thursday, March 18, 2010

Decor Definitions Update

My blog has been so quiet for comments these days! There's lots of new posts below so be sure to check them out if you haven't!

Some of you may remember this post where I finally made frames with the Decor Elements definitions "create" and "inspire." Well, I finally completed this project and hung it up! I didn't like that the two fabrics were different from each other, and Grant wanted them to be different colours, so I ordered some of the honeycomb pattern in blue! We both like the way the pink looks the best, but like having them the different colours so they are here to say. The blue doesn't translate well in the photo due to the lighting and size of the area in the picture, but it's quite soft and pretty!

Also, some of you have emailed and asked what size the frames are - they are 10" x 24" from Michael's.

Tuesday, March 16, 2010

Diaper Cake and Card

I have been wanting to make a diaper cake for a long time now and finally had the perfect opportunity to for my girlfriend at work. I'll probably be heading over there to give it to her this week and can't wait to see how her little baby has changed. I saw her the day after she was born and now she'll be a couple weeks old!

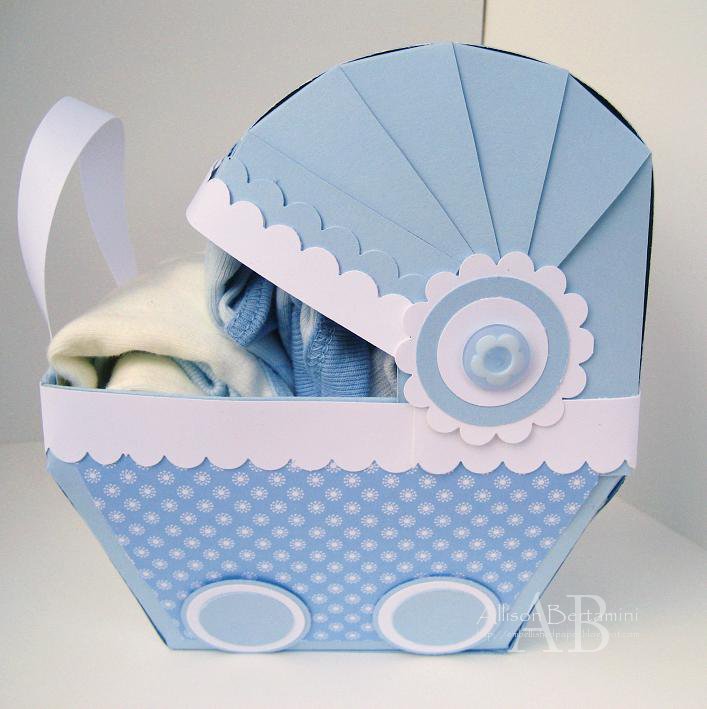
Here is the front view of the cake (You can click on any of the pictures for a larger view): 
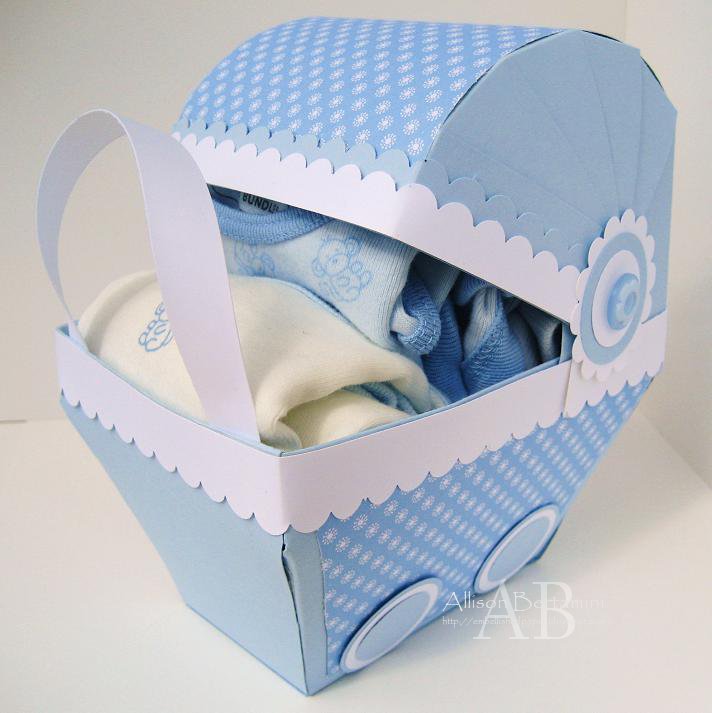
Here's a view of the cake from the sides where you can see a little bit of where I decided to place all the items that are included in the cake. The seams in cardstock appear more noticeable in the photos than in real life. What's included in this diaper cake:
-72 diapers
-1 blanket
-4 onesies
-1 temperature sensitive rubber duckie
-1 Johnson's essentials pack (that includes baby wash, lotion, shampoo, baby powder, penaten cream and nursing pads)

These diaper cakes can be as cheap or expensive as you want depending on how much you wanted to include. Seeing as I am quite good friends with her outside of work, I wanted to do more than just the diapers and top decoration!

After making the diaper cake, I didn't want to use the original card (you can see it in this post) I had made for her and wanted to make something that would match the cake. I was inspired by Jen's SFYTT for this card. Here's a better pic of it close up. I hope she loves this gift! I was a bit concerned that there is so much blue, but I don't think she'll mind. I really just took inspiration from the onesies!

You can see a tutorial on how to make your own diaper cake here. I personally had to modify it a fair bit in order to include all of the gifts but it's a great foundation to start with!

Stamping Related Supplies for Cake
Paper: SU Delicate Dots dp (retired)
Ribbon: SU 5/8" so saffron grosgrain

Card Supplies

Stamp: PTI bitty baby blessings
Ink: SU so saffron, versamark, pumpkin pie
Paper: SU ww, bashful blue, so saffron, delicate dots dp (retired)
Button: SU bashful blue
Misc: SU white embossing powder, circle cutter, dimensionals

Wednesday, February 17, 2010

Decor Elements in the Office

The office in our house is my craft room as well as a work space for Grant to prepare lesson plans for his students. We loved the idea of putting the Decor Elements definitions of create (for me) and inspire (for Grant) in the office space.

We purchased the vinyl definitions some time ago but only recently decided to put them up. I didn't want to put them directly on the wall as we are renting and looking into building a house in the near future. We found these great frames at Michaels that fit the element perfectly. To make them a little more interesting we purchased some fabric to put behind them. I want both of them to have the same fabric behind but I couldn't decide on which I liked more at the store so I bought two so I could see what they look like.

I love the pink (my favourite colour) and cute honeycomb pattern of this fabric.
I love the polka dots and green-blue colour of this one. After seeing both, I still can't really decide because they each have different things I like. Grant thinks we should leave them different but I want them one on top of the other in the office in the same pattern for consistency. Which do you think looks better?

Sunday, January 24, 2010

A Touch of Romance Tin

Here's another project from Andrea Walford's online class "A Touch of Romance". Scroll down to the previous post if you missed the first project. If you are interested in registering for the class check out this page on Andrea's blog. This was the first project that Andrea shares in the class and it's my favourite of all the projects. For this project I really stylized it my own way to make it exactly the way I wanted and Andrea encourages you to do so. Also, if you don't have the tin, she offers a different but similar project/template. I combined the two different projects to create this one. I am actually going to be giving the completed project to Grant later so I'm not sharing much information on what goes inside other than these little inserts. I'm trying not to let him see it "in person" until he gets it because I always find that pictures don't do projects justice (especially 3D items when you can't see all angles).

Stamps: SU A Happy Heart, Lots of Thoughts
Ink: SU Versamark, pretty in pink, chocolate chip, pink pirouette reinker (retired)
Paper: SU very vanilla, chocolate chip, pretty in pink, chocolate chip dp, sending love specialty dp
Ribbon: SU 5/8" pretty in pink satin, 5/8" chocolate chip satin, silver elastic cord
Punch: 1/2" circle punch
Misc: SU pretty in pink cordoroy button, build a brad, paper snips, crystal effects, band-aid tin

Saturday, January 23, 2010

Sick and Somewhat Productive

Make sure you scroll down to see today's first post!

I've been sick since Tuesday wtih a bad cold and unfortunately it conincided with my days off of work. Since I work nights there's only so little I can do while I am awake that won't disturb the neighbours or my pounding headache from the cold. As a result, I've made a couple of great projects that I want to share.I registered for Andrea Walford's (my upline) online class "A Touch of Romance" and this is one of the five fabulous projects she gives instructions for. In actuality it seems like more than five projects because she offers ideas and templates subsitutions should you not have the supplies for the original project. You can check out this post on Andrea's blog to read more about the class and register if you are interested! This is the wider of the two hearts: Here is the skinnier of the two boxes:Andrea gives the templates for both sizes of box to fit different sized treats! I just love how they open by the center heart flap. These were so easy to create too!

Stamps: SU Sweet Little Sentiments (retired)
Ink: SU real red
Paper: SU pretty in pink, real red, sending love specialty dp
Ribbon: SU 5/8" real red grosgrain, 5/8" pretty in pink satin, 1/4" real red and pretty in pink grosgrain
Misc: paper snips, hobby blade, Andrea's template

Thursday, December 17, 2009

Snowman Soup

A couple posts ago, I showed you these ornaments that I created for my husband to give to his grade 1 students. Originally, we were going to create Snowman Soup's for his students however, the woman who teaches his class in the afternoon decided to do that as an art project with them, so they're getting those ornaments.

Since we had all the supplies for snowman soup already, Grant decided we should give them to the class he teaches in the afternoon. He's been teaching that class for about a month and a half while their usual teacher is on a leave. So here they are!This is the whole lot of them that I created - a total of only 20. Each package contains a packet of hot chocolate, 3 Hershey kisses, a candy cane and 8 marshmallows. Here is a close up of the front of the tag. I LOVE this snowman image and it works so well with the snowman soup poem that we ended up using! This snowman image is one of my favourite of all the Stampin Up Christmas/winter images. Here's the other side of the tag that shows the Snowman Soup poem and directions on how to make it! I stamped the snowflake image all over the white cardsock before printing the poem on it. I love the way it looks. There are many different versions of snowman soup as well as other little Christmas candy poems out there. In trying to find the one that I liked best for Grant's students, I made a document that I posted on SCS so that everyone could access a single document that had all of the different versions on it. You can access it here: Compiled Soups and Poops.

Supplies

Stamps: SU Two Cool Dudes
Ink: SU baja breeze
Paper: SU ww, real red
Ribbon: SU real red 1/4" grosgrain, SU silver elastic cord
Bags: SU large cello bags

Sunday, December 6, 2009

Grade One Christmas Presents

I've finally finished making all of the ornaments that Grant is going to give his grade one students for Christmas. They love seeing their name on things so we thought these personalized ornaments would be perfect.

Here is a closer picture of one of the ornaments. Seeing as I didn't have any outline stamps that would be good to use for these ornaments (for this age group) Grant and I found this digital-stamp that was available for free from Aimee Asher. I printed it out on transparency then used black embossing powder on it so that the image wouldn't smudge. On the reverse side of the transparency I coloured all the parts I wanted white with my versamark pen and heat embossed them with white embossing powder. Then I coloured the images with sharpies and inserted them into the ornaments. Again, I used this ornament tutorial from SCS on how to insert the image into the ornament. Then I simply added silver elastic cord to be able to hang the ornament and the various coloured ribbon for extra pizzaz!

Overall, this was a very inexpensive gift. All that we had to purchase was the glitter and ornaments which came to only about $26 for 24 ornaments and we only needed 17 for the class!

Supplies:

Stamp: Aimee Asher snowfriends digital stamp
Ink: SU Versamark
Embossing Powders: SU black and white
Ribbon: SU silver elastic cord; Michael's red, blue and green Spool o'ribbon
Glitter: Martha Stewart crystal coarse glitter
Misc: transparency, clear ornaments, sharpies